The principle of the control program of the shoe anti-slip testing machine
1. If the control system of the shoe non-slip testing machine is programmable, use the previously stored program to operate the shoe non-slip testing machine in this way.
2. Protect the slab inside the slab holder with packing material to ensure that its upper surface is on the same level as the top edge of the slab.
3. If the slab has not been used before, it is necessary to reduce the sharpness of the surface, use a new or old shoe as a sample, and repeat the previous steps until 20,000 turns have been completed.
4. Use a new slab, or a slab that has been tested 20 times, to check its wear force. Follow the previous steps and let it rotate 12000 times by itself. Use a new or less used shoe as a test sample and use the formula to calculate its maximum loss.
If the maximum loss exceeds 0.84g, the slab is too rough and the procedure is repeated.
If the maximum loss is between 0.68g and 0.84g, it proves that the slab can be used for further testing.
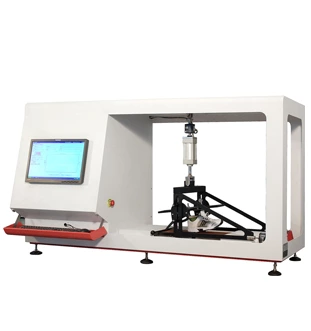
Shoe Slip Tester, Shoe Slip Test Machine
If the maximum loss is less than 0.68g, it proves that the slab can be discarded, and repeat the previous steps with a new slab.
5. If it is necessary to measure the thickness loss, refer to the previous steps and use the caliper to measure the thickness of the sample in millimeters. As described, mark all the measurement positions to prevent repetition.
5.1 Measure with a complete pair of shoes: toe, inner and outer juncture, inner and outer heel, heel Otherwise, if the sole has unique cleats or a similar pattern, choose a pattern in the front center of the shoe, and measure it the height of.
5.2 Using a thin disc of material, measure the diameters of these two to see if they are at the correct angle and mark them. The diameter of one of them, the longitudinal axis of its sole should be between the front toe and the rear heel.
6. When it is necessary to measure the maximum loss, use the balance mentioned above to measure each sample. It should be close to 0.01g in grams. You can find it in [Mo].
7. Put the sample into the appropriate size foot model to see if it fits tightly and secure it with shoelaces or other ties.
8. Make sure the shoe is on the shaft, then operate the machine.
9. After about 2000 laps, stop the machine, remove the debris generated by the wear from the machine, and then restart the machine.
10. Continue to run the shoe slip tester until it has completed 12,000 cycles, or until damage occurs, see 6.12 for details, stop and continue testing. Remove the sample from the mold, and if you need to measure the maximum loss, in the same humidity environment, after repairing, use the steps in 6.6 to measure, you can refer to the data in [Mn].
11. If it is necessary to measure thickness loss, use the procedure in Section 6.5 to measure the thickness at each location and refer to the data in [Tn].
12. Inspect the surface of the test specimen and note any damage, normal wear and tear being negligible. For example:
Ordinary abrasion patterns or nicks, surface delamination or dissolution, sole delamination or peeling, tread damage, heel damage, or other compression-related damage.
13. Repeat steps 6.5-6.12 for each sample.
14. For each sample, if you need to measure the maximum loss, use the following formula to calculate: 【M】=[Mo]-[Mn]
15. The formula for calculating thickness loss is:【T】=【To】-[Tn]
16. For each sample, record any damage, negligible normal wear, as in step 12, and the number of revolutions.
17. If possible, repeat steps 6.7-6.12, 12000 circles as a cycle.
Shoe slip tester test report:
- Test reference: SATRA TM362:2008
- A description of the shoe or sole material.
- A floor surface description
- If necessary, add the maximum loss test results in Section 6.14, and the number of complete turns.
- If necessary, add the thickness loss test results in Section 6.15, and the number of complete turns.
- Any damage other than ordinary wear and tear, and the number of revolutions mentioned in Section 6.16.
- Any standard test deviation.
- Details and test environment.
The shoe slip tester can help people know the test results.
Attention points of shoe anti-slip tester
1. Quality and thickness test
Mass loss is a fundamental measure of shoe wear resistance. Complementary thickness measurements may be beneficial, eg to compare forefoot and heel wear rates, to assess shoe wear resistance. Looking at the pattern on the sole, it is obvious that the thickness of the shoe is highly worn. Mass loss can be converted to volume loss if you already know the density of the shoe material.
2. Operation
The conditions mentioned above are derived from biomechanical studies and are related to walking in adults. It is suitable for assessing the wear resistance of shoes, allowing the shaft to rotate violently and alternately, but the wear is realistic.
3. Testing in other environments
If the shoes are not tested in the specified environment, the shoes will get wet. Quality damage will result, and in extreme cases, moisture will be worse if the shoe is not weighed.
4. Test on floors instead of concrete pavers
In special cases, test on the floor, then 6.3, 6.4 will not apply.
5. Test the abrasion resistance of the floor surface
The test method also applies to testing shoes on a floor surface, in which case the floor is the test sample and the shoes can be used to calculate the walking cycle. The test period and evaluation criteria for shoes need to be consistently agreed by suppliers and customers.

